Interesting article to read "How Poles created the new Enigma" especially that this cryptographic system was created in my alma mater.
If you are interested in Engima please have a look at this link Enigma machine.

Technology / Programming (C#,WPF, Silverlight) / Games / Photography
Wednesday 29 December 2010
Monday 20 December 2010
How to place items on a Canvas using ItemsControl and PrepareContainerForItemOverride method
If you have to place some items on a canvas and the whole process has to be performed automatically using binding and ItemsControl, so you have to be aware that ItemsControl wraps each item with ContentPresenter before adding it to the canvas. It means that defining bindings between Canvas.Left/Top attached properties and your bound objects will not reflect their position on the canvas because your binding should be defined one level higher in ItemsControl visual tree.There are at least two ways how you can solve this problem:
- harder one - to find a parent element (using VisualTreeHepler because there is no direct access to the ContentPresenter) of your visual data representation and bind it to the coordinates. The main disadvantage of this solution is that you have to modify your control because of the need to find a parent container. It makes an additional dependency and narrows the way how your control can be used in the future.
- simpler one - to create a class which derives from ItemsControl class and override PrepareContainerForItemOverride method where you can create necessary bindings to pass information about coordinates.
1: protected override void PrepareContainerForItemOverride(DependencyObject element, object item)
2: {3: FrameworkElement contentitem = element as FrameworkElement;
4: Binding leftBinding = new Binding("X");
5: Binding topBinding = new Binding("Y");
6: contentitem.SetBinding(Canvas.LeftProperty, leftBinding); 7: contentitem.SetBinding(Canvas.TopProperty, topBinding);8: base.PrepareContainerForItemOverride(element, item);
9: }If you look at input parameters of PrepareContainerForItemOverride method you will find a DependencyObject parameter which represents a wrapper (ContentPresenter) and an object parameter which represents bound data, so you have direct access to the data and you can bind whichever parameter you want (in this case coordinates).
If you would like to see this solution in action you can download it from source code section in this article: Convex Hull Algorith.
Sunday 19 December 2010
Andrew's Monotone Chain Convex Hull algorithm
This algorithm constructs convex hull of a set of 2D points.
Algorithm:

Example of usage:
Source code: ConvexHullAlgorithm.zip
Useful links:
Algorithm:
- Sorts points based on their X coordinate,
- Selects two points which contain minimum and maximum of X coordinate (P1, P2) from all points,
- Divides the set of points into two sub-sets (upper and lower hull) based on the line between point P1 and point P2,
- Processes points on per hull basis to detect points which have to be used to create a convex polygon.

Example of usage:
Source code: ConvexHullAlgorithm.zip
Useful links:
Sunday 12 December 2010
How to pass an ObservableCollection of DataGridColumns to a DataGrid placed in a UserControl
We have a UserControl with a DataGrid and we want to expose Columns property to make it accessible in XAML. To make a property visible in XAML we have to define a DependencyProperty but it is not everything apart from that we have to take care about DependencyProperty collection changes and refresh DataGrid Columns accordingly.
Example:
Example:
1: <Window x:Class="Test.MainWindow"
2: xmlns="http://schemas.microsoft.com/winfx/2006/xaml/presentation"
3: xmlns:x="http://schemas.microsoft.com/winfx/2006/xaml"
4: xmlns:local="clr-namespace:Test"
5: Title="MainWindow" Height="350" Width="525">
6: <StackPanel x:Name="s">
7: <local:UserControl1 x:Name="uc1">
8: <local:UserControl1.Columns>
9: <DataGridTextColumn Header="001"/>
10: <DataGridTextColumn Header="002"/>
11: <DataGridTextColumn Header="003"/>
12: <DataGridTextColumn Header="004"/>
13: </local:UserControl1.Columns>
14: </local:UserControl1>
15: <local:UserControl1>
16: <local:UserControl1.Columns>
17: <DataGridTextColumn Header="001"/>
18: <DataGridTextColumn Header="002"/>
19: </local:UserControl1.Columns>
20: </local:UserControl1>
21: <Button Click="HandleButtonClick" Content="UpdateHeaders"/>
22: </StackPanel>
23: </Window>
1: namespace Test
2: {3: public partial class MainWindow : Window
4: {5: public MainWindow()
6: { 7: InitializeComponent(); 8: } 9: 10: private void HandleButtonClick(object sender, RoutedEventArgs e)
11: {12: var collection = new ObservableCollection<DataGridColumn>();
13: uc1.Columns = collection;14: collection.Add(new DataGridTextColumn() { Header = "111" });
15: collection.Add(new DataGridTextColumn() { Header = "222" });
16: collection.Add(new DataGridTextColumn() { Header = "333" });
17: } 18: 19: } 20: }1: <UserControl x:Class="Test.UserControl1"
2: xmlns="http://schemas.microsoft.com/winfx/2006/xaml/presentation"
3: xmlns:x="http://schemas.microsoft.com/winfx/2006/xaml"
4: xmlns:mc="http://schemas.openxmlformats.org/markup-compatibility/2006"
5: xmlns:d="http://schemas.microsoft.com/expression/blend/2008"
6: mc:Ignorable="d"
7: d:DesignHeight="300" d:DesignWidth="300">
8: <DataGrid x:Name="dg">
9: 10: </DataGrid>
11: </UserControl>
1: namespace Test
2: {3: public partial class UserControl1 : UserControl
4: {5: public static DependencyProperty ColumnsProperty = DependencyProperty.Register("Columns",
6: typeof(ObservableCollection<DataGridColumn>), typeof(UserControl1), new FrameworkPropertyMetadata(Handle));
7: 8: public UserControl1()
9: { 10: InitializeComponent();11: Columns = new ObservableCollection<DataGridColumn>();
12: } 13: 14: void HandleCollectionChanged(object sender, System.Collections.Specialized.NotifyCollectionChangedEventArgs e)
15: {16: if (e.NewItems != null)
17: foreach (var column in e.NewItems)
18: dg.Columns.Add(column as DataGridColumn);
19: if (e.OldItems != null)
20: foreach (var column in e.OldItems)
21: dg.Columns.Remove(column as DataGridColumn);
22: } 23: 24: public ObservableCollection<DataGridColumn> Columns
25: {26: get { return (ObservableCollection<DataGridColumn>)GetValue(UserControl1.ColumnsProperty); }
27: set { SetValue(UserControl1.ColumnsProperty, value); }
28: } 29: 30: private static void Handle(DependencyObject d, DependencyPropertyChangedEventArgs e)
31: {32: var uc = d as UserControl1;
33: if (e.OldValue != null)
34: { 35: uc.dg.Columns.Clear();36: uc.RemoveCollectionChangedHandler(e.OldValue as ObservableCollection<DataGridColumn>);
37: }38: if (e.NewValue != null)
39: {40: uc.AddCollectionChangedHandler(e.NewValue as ObservableCollection<DataGridColumn>);
41: } 42: } 43: 44: private void AddCollectionChangedHandler(ObservableCollection<DataGridColumn> columns)
45: { 46: columns.CollectionChanged += HandleCollectionChanged;47: foreach (var column in columns)
48: dg.Columns.Add(column); 49: } 50: 51: private void RemoveCollectionChangedHandler(ObservableCollection<DataGridColumn> columns)
52: { 53: columns.CollectionChanged -= HandleCollectionChanged; 54: } 55: } 56: }Thursday 9 December 2010
Friday 3 December 2010
Thursday 2 December 2010
Master-detail scenario on a Module basis with Accordion control (PRISM 2.2, WPF, C#)
Master-Detail scenario on a module basis means that switching between items in accordion control (WPF Toolkit) changes modules and views accordingly. Each module contains two views one registered to the left hand side region (ToolRegion) and another one assigned to the right hand side region (DockRegion). To be more specific an opening of a particular item in accordion control causes an activation of a second view from the same module. DocRegion contains multiple views but only one can be visible at a time and an activation is a process which tells a region what to show.
Module definition
Module definition
A module in the Composite Application Library is a logical unit in your application. Modules assist in implementing a modular design. These modules are defined in such a way that they can be discovered and loaded by the application at run time. Because modules are self-contained, they promote separation of concerns in your application. Modules can communicate with other modules and access services in a loosely coupled fashion. They reduce the friction of maintaining, adding, and removing system functionality. Modules also aid in testing and deployment.
Region definition
Region is a slot/place holder in your window/shell space where a view can be registered. Region is view agnostic and collaborates with Region Adapter to deal with views. The power of regions comes in their ability to hold any type of UI content. A module can contain UI content manifested as a user control, a data type that is associated with a data template, a custom control, or any combination of these.
In the following example modules don't know about one another and don't communicate with themselves (communication between modules is possible based on EventAggregator). Modularity is the most useful aspect of this solution so modules can be loaded dynamically depends on predefined conditions creating a cohesive and flexible interface.

Source code (VS2010): MasterDetail.zip
Useful links:
Friday 26 November 2010
How to copy an HTML content to the Clipboard (C#)
If you want to copy an HTML content to the Clipboard you have to understand the concept of HTML Clipboard Format. When you copy a piece of HTML using Ctrl+C shortcut, OS creates previously mentioned header for you but if you want to achieve the same thing in code you have to prepare the header by yourself.
Header explanation:
Useful links:
1: Version:0.9 2: StartHTML:71 3: EndHTML:170 4: StartFragment:140 5: EndFragment:160 6: StartSelection:140 7: EndSelection:1608: <!DOCTYPE>
9: <HTML>
10: <HEAD>
11: <TITLE>The HTML Clipboard</TITLE>
12: <BASE HREF="http://sample/specs">
13: </HEAD>
14: <BODY>
15: <!--StartFragment -->
16: <P>The Fragment</P>
17: <!--EndFragment -->
18: </BODY>
19: </HTML>
Header explanation:
- Version vv - Version number of the clipboard. Starting version is 0.9.
- StartHTML - Byte count from the beginning of the clipboard to the start of the context, or -1 if no context.
- EndHTML - Byte count from the beginning of the clipboard to the end of the context, or -1 if no context.
- StartFragment - Byte count from the beginning of the clipboard to the start of the fragment.
- EndFragment - Byte count from the beginning of the clipboard to the end of the fragment.
- StartSelection - Byte count from the beginning of the clipboard to the start of the selection.
- EndSelection - Byte count from the beginning of the clipboard to the end of the selection.
According to the Microsoft StartSelection and EndSelection attributes are optional because sufficient information is provided in the fragment section. Below you can find an example of method which you can use for coping an HTML content to the Clipboard under the condition that input parameter 'fullHtmlContent' contains all necessary tags (a fully functional HTML document).
1: public void CopyToClipboard(string fullHtmlContent)
2: {3: System.Text.StringBuilder sb = new System.Text.StringBuilder();
4: string header = @"Version:1.0
5: StartHTML:<<<<<<<1 6: EndHTML:<<<<<<<2 7: StartFragment:<<<<<<<3 8: EndFragment:<<<<<<<4"; 9: sb.Append(header);10: int startHTML = sb.Length;
11: sb.Append(fullHtmlContent);12: int endHTML = sb.Length;
13: 14: sb.Replace("<<<<<<<1", startHTML.To8CharsString());
15: sb.Replace("<<<<<<<2", endHTML.To8CharsString());
16: sb.Replace("<<<<<<<3", startHTML.To8CharsString());
17: sb.Replace("<<<<<<<4", endHTML.To8CharsString());
18: 19: Clipboard.Clear(); 20: Clipboard.SetText(sb.ToString(), TextDataFormat.Html); 21: }1: public static string To8CharsString(this int x)
2: {3: return x.ToString("0#######");
4: }Useful links:
How to show a dynamically generated HTML content in a WPF application
If you have to show dynamically generated .html pages in your WPF application you can use a WebBrowser control. NavigateToString("...") method gives you full flexibility and navigates asynchronously to a string which contains the content for a document.
1: <Window x:Class="WpfApplication1.MainWindow"
2: xmlns="http://schemas.microsoft.com/winfx/2006/xaml/presentation"
3: xmlns:x="http://schemas.microsoft.com/winfx/2006/xaml"
4: xmlns:local="clr-namespace:WpfApplication1"
5: Title="MainWindow" Height="350" Width="525">
6: 7: <Window.Resources>
8: <WebBrowser x:Name="browser"/>
9: </Grid>
10: </Window>
1: public partial class MainWindow : Window, IDataErrorInfo, INotifyPropertyChanged
2: {3: public MainWindow()
4: { 5: InitializeComponent();6: browser.NavigateToString("<html><head><h1>Head</h1></head><body>" + DateTime.Now + "</body></html>");
7: } 8: }Sunday 21 November 2010
How to show HTML content in a WPF window
There are two ways to show HTML content in a WPF window using Frame or WebBrowser control. If you want to switch between WPF and HTML content seamlessly the Frame control is a better choice for you. If you need more control over HTML content, examine the object model of the page and/or monitor page navigation you should consider the WebBrowser control. Both these controls show standard Internet Explorer window with all additional features like JavaScript, Dynamic HTML, ActiveX controls.
XAML version:
1: <Grid x:Name="grid">
2: <Frame Source="http://bbc.co.uk" />
3: <!--or-->4: <WebBrowser Source="http://bbc.co.uk"/>
5: </Grid>C# version:
1: Frame frame = new Frame();
2: grid.Children.Add(frame);3: frame.Navigate(new Uri("http://bbc.co.uk"));
4: 5: //or
6: 7: WebBrowser browser = new WebBrowser();
8: grid.Children.Add(browser);9: browser.Navigate(new Uri("http://bbc.co.uk"));
Useful links:
Neutral Density Filter (B+W ND10)
Photos were taken with Canon EOS 450D and18-55mm lens.


 |


Saturday 20 November 2010
Close-Up Filter (B+W NL4)
If you are not satisfied with the macro photos taken with your camera and you would like to shorten the distance between a lens and a photographed object, it means that you need a close-up filter. For the following photos I used Canon EOS 450D with 18-55mm lens and optionally B+W NL4 close-up filter.

Without filter With filter


Useful links:
Wednesday 10 November 2010
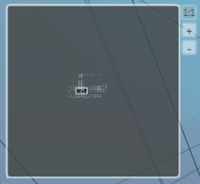
WPF App - Virtualized Canvas - 32k nodes + connections
Some time ago I faced the challenge of showing thousands of elements on the canvas at the same time. The list of requirement was short and tidy:
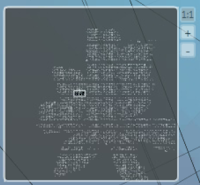
- presentation of thousands of elements,
- low memory consumption,
- fully responsive UI,
- real-time interaction.
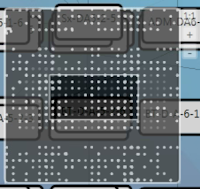
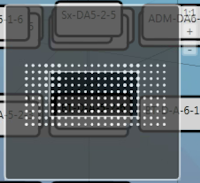
Showing thousands of elements on the screen is not a problem but if you want to minimize memory consumption and you don't want to wait ages for loading all elements (fully responsive UI) you have to run this process asynchronously and visualize only necessary elements. For detecting elements belonging to my visibility area (in this particular case screen + 25% margin) I decided to use Quadtree algorithm. On the pictures below you can find ZoomBoxes with all elements (left hand side) and just necessary elements detected by Quadtree (right hand side). ZoomBoxes on the left hand side contain simplified form of nodes (just nodes no connections, about 15k ellipses) loaded upfront to help users to find themselves on this huge canvas 66000 x 66000 pixels.


Tuesday 2 November 2010
Elegant Code - Laborers versus Professionals
I found this very interesting article Laborers versus Professionals. Remember to check links at the very bottom of the article, especially this one: The surprising truth about what motivates us.
Wednesday 27 October 2010
Converting WPF to XBAP (PRISM 2.2)
One day I had to make a conversion from WPF (PRISM 2.2) desktop application to XBAP application. Task which seems to be straightforward took me more time that I expected. I encountered some problems and I want to share all my conclusions and experiences.
My original approach in WPF desktop app (PRISM 2.2) is:
- No StartupUri attribute in App.xaml
- Regions are defined in Shell.xaml e.g. cal:RegionManager.RegionName="{x:Static common:RegionNames.DocRegion}"
- App.xaml.cs / OnStartup creates and runs UnityBootstrapper
- UnityBootstrapper registers Modules, Types, creates ShellPresentationModel + Shell
WPF => XBAP conversion
Step 1.
Instead of using App.xaml.cs and
1: protected override void OnStartup(StartupEventArgs e)
2: {3: base.OnStartup(e);
4: UnityBootstrapper bootstrapper = new Bootstrapper();
5: bootstrapper.Run(); 6: } I had to use App.xaml and StartupUri="..." attribute.
Step 2.
I had to remove all my XAML region references cal:RegionManager.RegionName="..." and replace them with RegionManager.SetRegionName(..., ....). XBAP application (with StartupUri attribute) creates Shell before creating Bootstrapper, so at this stage application is not aware of existence of RegionManager.
I had to remove all my XAML region references cal:RegionManager.RegionName="..." and replace them with RegionManager.SetRegionName(..., ....). XBAP application (with StartupUri attribute) creates Shell before creating Bootstrapper, so at this stage application is not aware of existence of RegionManager.
1: public partial class Shell : Page, IShellView
2: {3: public Shell()
4: {5: Bootstrapper bootstrapper = new Bootstrapper(this);
6: InitializeComponent(); 7: bootstrapper.Run(); 8: } 9: 10: //...
11: 12: }Step 3.
I had to populate the constructor of my Shell with Bootstrapper and pass Shell reference into Bootstrapper to make region registering process (step 2) possible.
1: public class Bootstrapper : UnityBootstrapper
2: {3: private IShell shell;
4: 5: public Shell Shell
6: {7: get { return shell as Shell; }
8: } 9: 10: public Bootstrapper(IShell shell)
11: { 12: shell = shell; 13: } 14: 15: //...
16: 17: protected override DependencyObject CreateShell()
18: { 19: ShellPresentationModel presenter = Container.Resolve<ShellPresentationModel>(); 20: ShellView.Model = presenter; 21: 22: RegionManager.SetRegionName(ShellView.DocRegionControl, 23: RegionNames.DocRegion); 24: 25: //...
26: 27: return ShellView;
28: }29: }
Useful links:
Sunday 17 October 2010
Seagate 500GB / ST3500320AS firmware SD15
I bought two Seagate HDDs and one of them died few months ago (my HDD acquired the power of invisibility). :-( My first thought was 'There has to be the first time', so I accepted it (2 partitions were gone) without looking for a solution. When my second HDD died I was devastated, especially that the second one contained all my photos, documents and programming stuff. This time I decided to dig and find out what and why happened, because it is impossible to loose two HDDs in 2-3 months period.
I found out plenty of solutions and I decided to follow one of them.
I bought Nokia CA-42 cable (<£3) + a box of single cables from Maplin (8 cables per box <£3).
You have to decompose a female end of your cable (picture below) to acquire a connector which you can use for your Nokia cable.

My cable wasn't the original one so I wasn't able to identify the endings (GND, RX, TX) based on the reconnaissance performed on the USB end. I had to spent some time searching/testing and this is the final working solution: BLUE means RX, BLACK means GND, WHITE means TX. If you want to connect it to your bricked HDD you have to connect BLACK to GND jumper, BLUE to TX jumper and WHITE to RX jumper.


When your cable is prepared you can move to the next step which you can find for example there:
Remember to read everything carefully before you start the whole procedure.
Good Luck!
Subscribe to:
Posts (Atom)